相思资源网 Design By www.200059.com
教程细节
软件:Adobe Illustrator CS3
难易:初级
预计完成时间:30分钟
Final Product What You'll Be Creating
成品图
In this tutorial you will learn how to make an illustration for a magazine cover and learn how to use the opacity mask ,the gradient tool and the pen tool to make some leaves with water drops on them and cloudy background. This technique can be applied to many different objects. Let’s get started!
本教程你要学习怎样绘制杂志封面上的矢量图,学习怎样使用不透明调板,渐变工具,怎样使用钢笔工具绘制滴着露珠的叶子和云的背景。这种技巧可以应用在各个不同的对象上。好了,让我们现在开始吧!
Step 1
First, make a leaf shape using the Pen Tool.
1.首先,使用钢笔工具绘制出一片叶子的形状。

Step 2
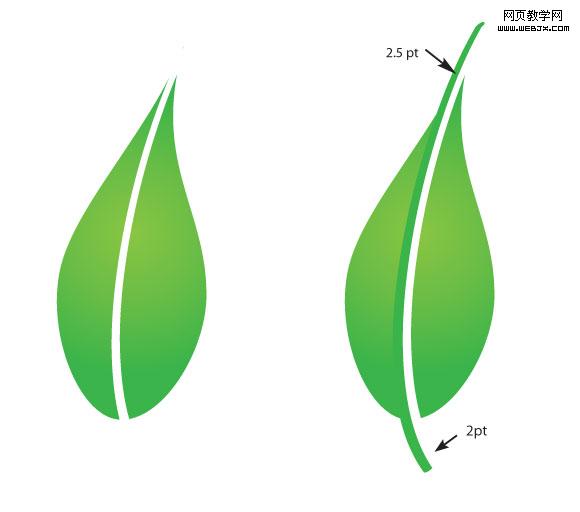
Add a white stroke along the leaf and then press (Command + C) to copy ,(Command + B) to send to the back. Now you have two strokes , the white one in the front and color the other one with green and move it a little bit to the left. Use the image below for reference.
2.沿着叶子的脉络绘制一条白色的描边,然后按Ctrl+C复制,Ctrl+B粘贴在后面。现在你有2条描边了,白色的在前面,另一条填上绿色并且绿色的这条向左移动一点。参照下图。
注:实际2.5pt,2pt没有下图所示那么粗,这里可以设定为20pt,10pt,具体可以根据图像大小自定。

Step 3
Expand the strokes (Object > Expand), select them all and from the Pathfinder panel press merge.
3.扩展描边(对象>扩展),全部选中,切到路径查找器调板,按合并按钮。
注:合并的话得不到图示的路径,我重新写一下。

扩展描边后,叶子和扩展后的绿色描边形状相加,然后减去扩展后的白色描边(在路径查找器中完成)。完成后得到上图右边的路径。
注:白色描边的堆栈顺序必须在叶子和绿色描边形状相加后的复合路径之上。
形状相减的另一层隐义就是减去前面的形状。
相加相减之后叶子可能需要重新填色渐变,重新填色即可。
Step 4
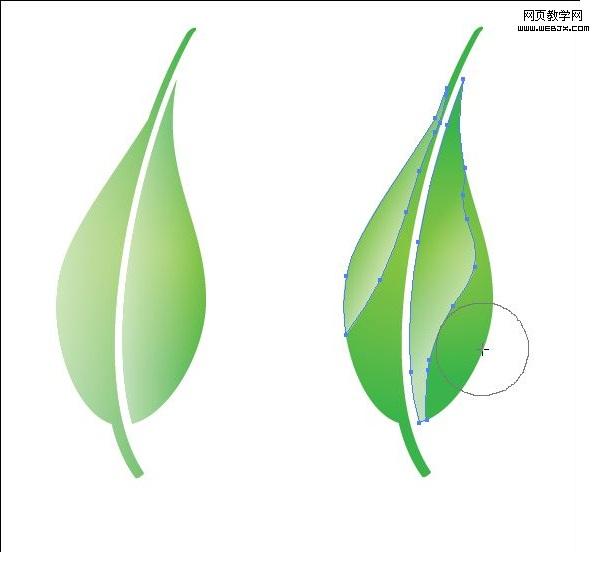
Select the leaf then press (Command + C) for copy, (Command + F) paste in front, select the copy and fill it with gradient of half opacity white to 0 opacity white. Erase parts of the leaf (like in the image) to make the leaf shine.
4.选择叶子,然后按Ctrl+C复制,Ctrl+F粘贴在前面,选择副本,填色50%不透明白色到0%不透明白色渐变。去除叶子多余的部分(如图)以创建叶子的光亮面。

Step 5
Make several leaves in the same manner, and arrange them in a manner similar to the image below.
5.用同样的方法绘制其它的叶子,然后用你喜欢的方法把它们进行排列组合,就像下图一样。

Step 6
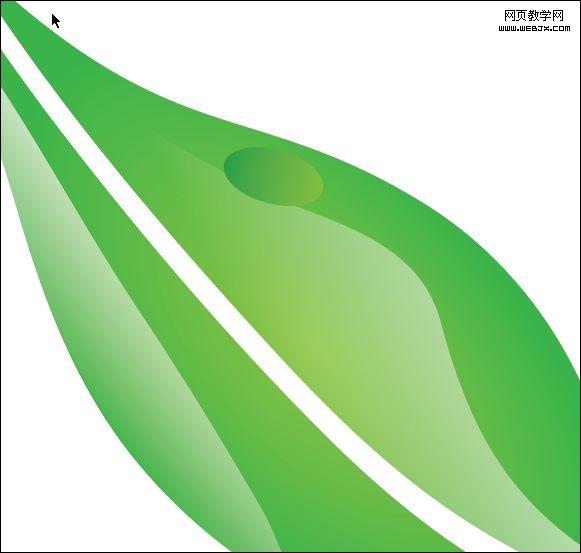
Begin making the water drop with an ellipse shape with a green gradient.
6.使用椭圆工具绘制露珠,填充绿色渐变。

Step 7
Make a smaller ellipse with a white to green gradient and add smaller ellipses inside of it.
7.绘制更小的椭圆,应用白到绿色渐变,然后再在椭圆内部绘制更小的椭圆。

Step 8
Distribute the drops on the leaves like in the image below
8.在其它叶子上也添加几滴露珠,如图所示。

露珠上的发散光,可以先绘制一个几角星(如:七角星),然后选择“效果”菜单>扭曲和变换>收缩和膨胀,收缩(负数为收缩)来实现。
Step 9
Now we will make the bubble for behind the leaves, start by making a circle with radial gradient (blue to white).
9.现在我们来绘制叶子后面的水泡,先创建一个径向渐变的圆(蓝到白渐变)。

Step 10
Like with the water drop, make circles inside with a white to transparent gradient and then add a moon shape at the bottom .
上一页12 下一页 阅读全文
软件:Adobe Illustrator CS3
难易:初级
预计完成时间:30分钟
Final Product What You'll Be Creating
成品图
In this tutorial you will learn how to make an illustration for a magazine cover and learn how to use the opacity mask ,the gradient tool and the pen tool to make some leaves with water drops on them and cloudy background. This technique can be applied to many different objects. Let’s get started!
本教程你要学习怎样绘制杂志封面上的矢量图,学习怎样使用不透明调板,渐变工具,怎样使用钢笔工具绘制滴着露珠的叶子和云的背景。这种技巧可以应用在各个不同的对象上。好了,让我们现在开始吧!
Step 1
First, make a leaf shape using the Pen Tool.
1.首先,使用钢笔工具绘制出一片叶子的形状。

Step 2
Add a white stroke along the leaf and then press (Command + C) to copy ,(Command + B) to send to the back. Now you have two strokes , the white one in the front and color the other one with green and move it a little bit to the left. Use the image below for reference.
2.沿着叶子的脉络绘制一条白色的描边,然后按Ctrl+C复制,Ctrl+B粘贴在后面。现在你有2条描边了,白色的在前面,另一条填上绿色并且绿色的这条向左移动一点。参照下图。
注:实际2.5pt,2pt没有下图所示那么粗,这里可以设定为20pt,10pt,具体可以根据图像大小自定。

Step 3
Expand the strokes (Object > Expand), select them all and from the Pathfinder panel press merge.
3.扩展描边(对象>扩展),全部选中,切到路径查找器调板,按合并按钮。
注:合并的话得不到图示的路径,我重新写一下。

扩展描边后,叶子和扩展后的绿色描边形状相加,然后减去扩展后的白色描边(在路径查找器中完成)。完成后得到上图右边的路径。
注:白色描边的堆栈顺序必须在叶子和绿色描边形状相加后的复合路径之上。
形状相减的另一层隐义就是减去前面的形状。
相加相减之后叶子可能需要重新填色渐变,重新填色即可。
Step 4
Select the leaf then press (Command + C) for copy, (Command + F) paste in front, select the copy and fill it with gradient of half opacity white to 0 opacity white. Erase parts of the leaf (like in the image) to make the leaf shine.
4.选择叶子,然后按Ctrl+C复制,Ctrl+F粘贴在前面,选择副本,填色50%不透明白色到0%不透明白色渐变。去除叶子多余的部分(如图)以创建叶子的光亮面。

Step 5
Make several leaves in the same manner, and arrange them in a manner similar to the image below.
5.用同样的方法绘制其它的叶子,然后用你喜欢的方法把它们进行排列组合,就像下图一样。

Step 6
Begin making the water drop with an ellipse shape with a green gradient.
6.使用椭圆工具绘制露珠,填充绿色渐变。

Step 7
Make a smaller ellipse with a white to green gradient and add smaller ellipses inside of it.
7.绘制更小的椭圆,应用白到绿色渐变,然后再在椭圆内部绘制更小的椭圆。

Step 8
Distribute the drops on the leaves like in the image below
8.在其它叶子上也添加几滴露珠,如图所示。

露珠上的发散光,可以先绘制一个几角星(如:七角星),然后选择“效果”菜单>扭曲和变换>收缩和膨胀,收缩(负数为收缩)来实现。
Step 9
Now we will make the bubble for behind the leaves, start by making a circle with radial gradient (blue to white).
9.现在我们来绘制叶子后面的水泡,先创建一个径向渐变的圆(蓝到白渐变)。

Step 10
Like with the water drop, make circles inside with a white to transparent gradient and then add a moon shape at the bottom .
上一页12 下一页 阅读全文
标签:
矢量,卡通绿叶
相思资源网 Design By www.200059.com
广告合作:本站广告合作请联系QQ:858582 申请时备注:广告合作(否则不回)
免责声明:本站文章均来自网站采集或用户投稿,网站不提供任何软件下载或自行开发的软件! 如有用户或公司发现本站内容信息存在侵权行为,请邮件告知! 858582#qq.com
免责声明:本站文章均来自网站采集或用户投稿,网站不提供任何软件下载或自行开发的软件! 如有用户或公司发现本站内容信息存在侵权行为,请邮件告知! 858582#qq.com
相思资源网 Design By www.200059.com
暂无Illustrator 绘制矢量的卡通绿叶(不透明调板)的评论...
稳了!魔兽国服回归的3条重磅消息!官宣时间再确认!
昨天有一位朋友在大神群里分享,自己亚服账号被封号之后居然弹出了国服的封号信息对话框。
这里面让他访问的是一个国服的战网网址,com.cn和后面的zh都非常明白地表明这就是国服战网。
而他在复制这个网址并且进行登录之后,确实是网易的网址,也就是我们熟悉的停服之后国服发布的暴雪游戏产品运营到期开放退款的说明。这是一件比较奇怪的事情,因为以前都没有出现这样的情况,现在突然提示跳转到国服战网的网址,是不是说明了简体中文客户端已经开始进行更新了呢?
